Good Morning Ladies,
Our Guest Designer Maria, is sharing a tutorial today for this lovely card.
1. Cut a piece of white card stock (CS) to 11 x 4.25 inches, score at 5.5 inches to create a card base and set aside.
2. Cut a second piece of CS to 4.25 x 5.5 inches. Stamp the Hero Arts Woodgrain Background in clear or white pigment ink. Heat emboss the image using clear embossing powder.
3. Trim this piece down to 4 x 5.25 inches.
4. Die cut the letter “u” from textured yellow CS 3 times. Glue the 3 pieces together to form 1 embellishment and coat with Stickles or glitter glue. Set aside to dry.
5. Arrange dies as shown and secure them with masking tape. TIP – Use masking tape and a grid to easily align letters and spacing.
6. Run panel through your die cutting machine. Remove the edge die and place the letters in their second position.
7. Run panel through the die cutting machine, move the letters down and cut one more time.
8. Carefully trim the top cut all the way to the edge, remove any remaining pieces.
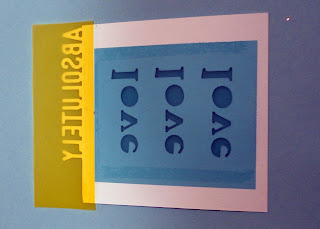
9. Adhere strips of colored vellum to the back. Here, I used yellow as a background for the top and blue for the rest. For a gradient effect, use one layer for the top row, two for the second and three for the bottom. You’ll note that the yellow piece is larger than necessary. Trim excess vellum to restore the panel to 4 x 5.25. It’s easier than trying to line it up perfectly. ;)
10. Adhere the letter U next to the third die cut “love” with Glossy Accents or another good glue.
11. Add dimensional adhesive to the back of the panel and adhere to card base.
Thanks for the tutorial Maria! It was so sweet of you, to give us all step by step pictures along with the instructions!
If you all want to see more of Maria's lovely work We'll see you back here Friday!
Hannah
and the DCD Design Team


10 comments:
What a great card and tutorial!
Love the card and the tutorial was fun to follow and so easy to follow. Thank you for the tutorial.
Love this fun and creative card, Maria! Fab tutorial too! :)
Love your card, Maria! Thanks so much for the detailed tutorial...it's so helpful to see the steps and how you lined things up!
Great solution to add more layers when you will get a deeper shade of blue!
I love this tutorial. Maria thank you so much for doing this for us.
Great tutorial, Maria! Cool idea to double/triple up the vellum to get that gradient effect. something else to commit to my memory for future use.....
Terrific card & great tutorial, Maria!
Very creative card, Maria! Love the vellum idea and the bright colors. Great pictures too!
Great tutorial, Maria!
Post a Comment