One thing I love about being a part of the DCD is the fact that we all have our own way each month to share with you ideas and inspiration, and being all over from the world, we all have our own little schedule we follow. It makes each month exciting and you never know what to expect from us as we all go about it a little differently.
And if you remember my last month of hosting, I did my Favorite die of the month, I had so much fun with that that I think it will become forever a part of my hosting and I will bring you a new die to showcase each and every time.
It is hard to pick a favorite among endless supplies, but after going through them I decided I would share with you my favorite set of Spellbinders Nestabilities
I can't argue with the fact that each and every set are special in their own way, but I have always prefered the Ovals,
So this week I hope you will join me and see some of the many things you can do and be inspired! Using just these few elements for all my cards that I will share with you throughout this week.
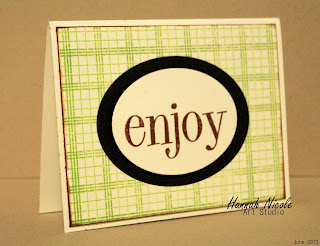
This card was very simple and took about 10 Minutes to make
For the First Step you will need 2 Nesties ( as we call them) nested inside each other and placed on the cardstock using just a bit of tape to hold it in place, such as washi tape, and run it through your machine to create a frame and set it aside.
Next you will need your card base, Grab and 81/2 x 11 sheet of cardstock and cut it in half, for a top fold cut it at 4 1/4 longways, or for a normal card cut at 5 1/2 widthwise.
Now you will need to place your die cut frame without adhering it on the card till you find your desired position, using it to tell you where to stamp, once your image is stamped in place you will now need to make a mask.
To mask means to cover an area on which you don't want a stamp or ink to apear.
Using only the larger of the 2 nesties you used make your frame, run it through your machine and place it over your stamped image to cover it, using washi tape underneath or removable adhesive to keep it in place.
Now you can stamp a backround image over the mask, once you have stamped the image, you can remove your mask, and you will see that the space you covered is clean.
Now back to the frame.... I chose to do it on white cardstock so I could color it myself, rubbing blue (salty ocean) distress ink on it and stamping over it in the same color, after that is done just adhere it on your card and it is finished. I added the banner on top once the card was put together, just to add more to the card to dress it up just a little, but you could always stamp the sentiment within the frame if you had room or if that is all you used.
And there you have a quick simple easy card, to send a friend or for your little guy to send his friend.
Come back Wednesday and see what else you can do with our oval nestie! and join our monthly challenge, for a chance to win a cute set of your choice from Lawn Fawn
Come Again!
Hannah and the DCD Design Team.


