Pages

Monday, August 31, 2015

Thank You to Crestelle Clothing and Crafts

Thank you to our fabulous sponsor and all Le Crystelle Clothing and Crafts has done for us.  We got to play with the step-cards and wonderful dies or stamps.  
Be sure to visit our sponsor.

I love the deep red poinsettia against the stark white background.  A few little gems and a sticker for the sentiment is all it needed to complete this card.
Le Crystelle Clothing and Cards 2 Fold Heirloom
Le Crystelle Clothing and Cards Spellbinders Poinsettia Die


Michelle has created another stunning card this last day for our sponsor.The intricate embossing, deep robust color and beautiful ornament make such an elegant presentation.  Michelle used dies and stamps from our sponsor.

Le Crystelle Clothing and Cards Spellbinders 283 Heirloom Orn, Cuttlebug Anna Griffith Diamond Tree Embossing Folder, JustRite Christmas Miracle Ornament stamps

Hannah created a simple classic look
Le Crystelle Clothing and Cards 2 Fold Heirloom
Le Crystelle Clothing and Cards Spellbinders Poinsettia Die

Thank you to Le Crystelle for your sponsoship
from Arlene and the Die Cut Divas

Friday, August 28, 2015

Dawn has Christmas in Mind

Dawn has created a fanciful card of deer traipsing around the ornament.  To me it has a "day gone by" feel to it.  

lecrystelle

August Challenge
Your Favourite Holiday

Le Crystelle - Step card 
Kaisercraft stamps 
Spellbinders Heirloom Ornament
PP from My Minds Eye

Arlene and the Die Cut Divas

Wednesday, August 26, 2015

Cathie Goes Modern

Cathie Swirls us around with a modern style and some gorgeous paper.  

lecrystelle

August Challenge
Your Favourite Holiday


DigiColors Christmas Swirls paper.

Tuesday, August 25, 2015

A Brand New Diva

Announcing the addition of a new Diva to Die Cut Divas.  Rebecca will begin posting for our September challenge.  We wanted you to get to know Rebecca, so we asked her to write a little bit about herself and we're so glad to share her with you.  Please welcome Rebecca.


 I live in Church Village, Wales.  It is a lovely location in Wales because we are approximately 10 miles from Cardiff  and 30 miles from the beautiful countryside of the Brecon Beacons. I live with my husband and two sons,  Ieuan, 17 and Dewi 12. I have always enjoyed crafting, I started with knitting when I was a child. When my eldest son started school I started to make my own personalised greeting cards. My sons studied through the medium of Welsh so we wanted to send Welsh language cards to Teachers and friends. Welsh cards are few and far between and the ones you can buy on the high street are very basic. My mother and mother-in-law are both called Mam as are a lot of other mothers in Wales but you can't buy many on the high street. My Mam is also known as Mam-gu (Welsh for Grandmother) so handmade cards are ideal for her. I always use die-cuts on my cards and very often I only use die-cuts. I often use embossing folders too. I use an Ebosser.  You will find my blog at  cardsbybeckie.blogspot.co.uk

Rebecca x

Monday, August 24, 2015

Monica Steps It Up

Monica delights us with this elegant display of ornaments.

lecrystelle

August Challenge
Your Favourite Holiday

Such a gorgeous card.  Monica shows us what a bit of embossing paste can do for a card.  I never gave it a thought, but you've inspired me.
Le Crystelle supplies: Spellbinders 283 Heirloom Orn2 Fold Heirloom,
Misc: Sentiment (Hero Arts), Stencil (TIm Holtz), embossing paste, twine and adhesive gems

Arlene and the Die Cut Divas

Saturday, August 22, 2015

We're in the Heart mood


lecrystelle

August Challenge
Your Favourite Holiday


Dawn has caught the strings to my heart with this card.  WOW!
Spellbinders Lace Hearts
Le Crystelle step card (Tri-Fold Hearts)
Winnie & Walter die cut and stamp sentiment

Arlene used a different step card to show off the 
lovely Lace Hearts.
I really like the sherbet color of the card stock.  A card made with this color remains soft and comforting.
Spellbinders Lace Hearts
You can check out the different layers to my card at A Bit of This and That.

Thursday, August 20, 2015

Heart, We Have Heart

Marsha's got heart, lots of Heart, as we can see in her card.

lecrystelle

August Challenge
Your Favourite Holiday

Marsha is showering us with hearts and flowers.The lacy heart is just a gorgeous centerpiece and Marsha shows it off so well.  I think I've fallen in love the the Lace Hearts dies.
 Spellbinder Lace Hearts

Arlene and the Die Cut Divas

Wednesday, August 19, 2015

Everyone Loves a Tutorial.

 Here today is our Guest Designer this month Lisa Babitz with an amazing card and an amazing tutorial to go with it.
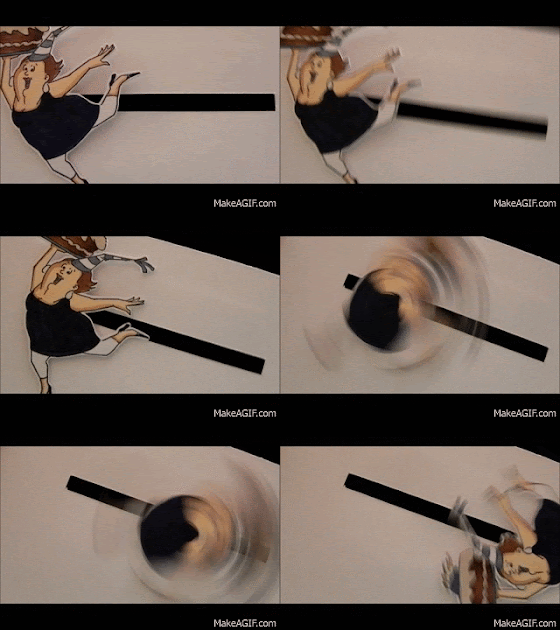
Lisa has created this amazing penny slider card.
And this is what it looks like it action

And now onto the Tutorial 

I've recently made two penny slider/spinner cards, and I must say, I LOVE watching the elements roll across the cards!  (Simple pleasures, right?!)  So I figured I'd post a tutorial on how to make one!!
A penny slider card has an element on the card that spins as it travels across the card.  It’s called a penny slider card because the spinning element is mounted on a “sandwich” of two pennies with a pop dot in the center which rolls across the card in a slot or channel that you create on the front of your card.
 There are three basic parts to a penny slider card:  the element that slides/spins, the channel or slot it spins across, and the card front itself.
1.  To make the sliding/spinning element:
For this step, you need: 2 pennies, a round foam pop dot, glue dots and the thing you want to spin across your card.
 a.  Choose an image or element.  Stamped images either cut out or stamped on a basic shape work well.  Small, 3-D objects like flowers work well also. Whatever you decide to use needs to be larger than a penny (or whatever coin you plan to use to create your spinner) so the penny will be hidden when the card is assembled.  (I am going to use the birthday gal image, Art Impressions (Hampton Art) # PS0919, for the rest of my tutorial.)

b.  Create half the penny "sandwich" by adhering a round, foam pop dot to the CENTER of one penny.  The size of the pop dot does not matter as long as it is smaller than the coin.


c.  Adhere the image or element to the other side of the penny with glue dots.  Try to make sure the penny is centered on the back of your element.


d.  I'd wait to do this final step until after you create your channel (see section 3), but the final step to create your penny "sandwich" is to attach a second penny to the other side of the pop dot.  Once done, the pop dot will be "sandwiched between two pennies, and this "sandwich" will be attached to the back of your image/element.


2.  Design your card front:
This is the step that requires little explanation since anything goes!  Just plan your card front to incorporate the spinning element you created in the section above.  I suggest using a heavy weight card stock for this panel (either by itself or mounted behind a piece of patterned paper) since you need it to be somewhat sturdy. A flimsy card front will bend slightly and cause the spinner to get stuck as it travels.  (For this tutorial, I am using a plain, white piece of card stock.  Pretend it is decorated beautifully!!)

3.  To create the channel across the front of your card:
For this step, you need a cutting tool (like scissors, a craft knife,  a die or a trimmer) to create the channel/slot.
 a.  This slot can either be hand-cut, die cut, or created with an electronic die cutting machine.  The slot can be as long/short as you desire.  To prevent the spinning element from hanging over the edges of your card when it gets all the way to the right or left, place your element upside down and note where the pop dot on the penny needs to stop in order for the element to stay within the boundaries of the card.  (Check all possible directions of the element.)  This will give you an idea of how long to make your channel.  (The element will stop spinning to the left when the left side of the foam pop dot hits the left edge of the channel.  The dashed line on the card stock shows where the channel should end based on where the foam pop dot is for this particular element.)

So the yellow highlighted line (below) shows a good length for the channel. Anything shorter is fine; there will just be less room for your spinner to spin. Anything longer will allow the spinning element to hang off the card (which is fine if you are ok with that!).


b.  To determine how wide to make the channel, look at the pop dot and coins you chose to use.  Your slot needs to be just slightly larger than the diameter of the pop dot and smaller than the distance from the edge of your coin to the opposite edge of the pop dot.  You want the pop dot to be able to spin freely in the channel, but you don't want the sandwich to fall out of the slot once it is inserted. In the photo above, the line represents the bottom of the channel or slot on which the pop dot will sit/roll.  The little arrow shows a good place to cut the top of the channel because it is above the pop dot but below the top of the coin.
This is a good width.  The penny sandwich can move freely but won't fall out.

 The slot below is too wide.  The penny sandwich can move freely, but the coin is not big enough to stay in the slot.


To fix this, you can use a larger coin (or cut a more narrow channel/slot).
4.  Assembly:
For this step, you need pop dots or foam tape.
a.  If you still need to finish the penny sandwich, you can do that now by attaching the second penny to the foam pop dot directly over the first penny.
b.  Carefully insert the back penny in the slot by pushing the slot open slightly with your fingers.  Once in, it should not fall out.  (Again - If the element does not spin freely, your slot needs to be wider.  If the element falls out of the slot as it spins, your slot is too wide.  To fix this, use a larger coin.)


c.  Once your card front is complete with the spinner element inserted in the slot, it's time to adhere it to the card base.  This panel needs to be raised to allow the penny sandwich to roll freely so use pop dots or foam tape.  On the back of the card front panel, place the foam tape or pop dots around the channel (without touching the penny) as shown below, and around the edges of the panel (not shown).  You may need to double up the foam tape or pop dots to raise the panel enough so the card base does not come in contact with pennies.

Attach this panel to your card base, and enjoy!

Supplies
We R Memory Keepers Nesting Dies "Circles" 
Spellbinders "A2 Matting Basics B"  (to cut the channel)

Tuesday, August 18, 2015

Lisa's Cards

        Lisa Babit is our guest designer for August, 2015.  

Here are Lisa's Card Examples Aren't these wonderful examples of different styles, playful, whimsical subtle, cute, just a little bit of everything.

If you did not see Lisa's interview, please check here. These are just a taste of what Lisa has in store for you tomorrow.  Stop by and view her tutorial. I just peeked and OH!  You have got to come back tomorrow.  A true show-stopper!


Arlene and the Die Cut Divas


Monday, August 17, 2015

Guest Designer Day

August welcomes our newest guest designer!

Lisa Babit is our guest designer for August, 2015.  
Welcome to Lisa!

How long have you been a papercrafter and when did you start?

I started scrapbooking in 1999 when my close friend asked me to host a Creative Memories demonstration at my house.  I was immediately hooked and began hosting monthly workshops.  I began scrapbooks for each of my four children (in the place of baby books) and am still working on them.  I began stamping and cardmaking more recently (March 2013), and that seems to take up more of my time now.


What is your favourite type of papercrafting, card making, scrapbooking, mixed media etc?

At the moment, cardmaking is probably my favorite.  I like that the projects are easy to finish. (I may never get caught up/finished with my kids' scrapbooks!) 

How would you describe your style?

One of the things I love about cardmaking is that each project is completely independent, and creating a card is the perfect opportunity to try new techniques.  I love watching tutorial videos and looking at other crafters' projects for inspiration.  As a result, I don't really have a specific style but try a variety of things.  I do tend to  like clean lines, layers (with mats, dies and/or embossed panels) and warm colors, but I am still searching for "my style."


Do you like to follow sketches, yours or others or do you dive right in?

I rarely follow sketches, but when I do I wonder why I don't do it more often!  


How often do you get to craft?

I am a stay-at-home mom with children who are now in college and high school (with tons of afterschool sports and activities).  With fewer opportunities to volunteer at their school during the day, my days are pretty free while my afternoons and evenings are crazy busy.  When I'm feeling creative, I may be in my craft room every day of the week for hours.  And if I'm struggling with ideas, I may not get in there at all in a week.  (Of course I have to work around getting stuff done around the house!)Even when I am not actually crafting though, I am always thinking about ideas  and stop by my computer quite often to check out what is new and what others are doing.


What is your favourite tool(what can’t you create without) and why?

This is a hard question to answer.  I am addicted to papercrafting tools and supplies and LOVE them all!  It's really hard for me to watch a tutorial video and not rush out to get the tools and supplies I need to try it out.  If I had to pick my favorite  at the moment, I'd have to say it is my MISTI.  It has made stamping so much easier which means less "do overs" and being able to focus on the more complicated parts of a project.


What is your favourite technique?

I sponge and ink on most projects, so I guess that would be considered a favorite.  I have a lot of techniques I love, though.


What at the moment is your most favourite thing to do on a project?

I like inking my edges to give my project a more finished look, and while I am not a huge ribbon fan, I like adding a touch of jute, twine or raffia to my projects as a simple, rustic embellishment.

Have you been published or are you on a Design Team, when and where?

I am currently on the design team over at Perfectly Rustics.

Describe or if possible supply pictures of your crafting area?

I had to pop a photo in so you could catch a glimpse of this fabulous craft room.  You have to visit the blog
craft room view a

I have photos of my craft room on my blog (HERE).

Do you have a blog? If not where can we see more of your fabulous creations?


Thank you for telling us about yourself, we loved getting to know you.

Saturday, August 15, 2015

First Time I've Ever Seen a Book Step Card

Monica present a terrific fun card in book form.  Fabulous colors and she is going to love giving this card to some one.


lecrystelle

August Challenge
Your Favourite Holiday


Le Crystelle supplies: Book step card
Misc: pattern paper, CC Design images,copics

Thursday, August 13, 2015

We've Got Signs of Pumpkin

Le Crystelle Clothing and Crafts is our sponsor for August

lecrystelle

August Challenge
Your Favourite Holiday

Marsha loves pumpkins and she likes to send pumpkin and harvest cards to her grandkids. I bet she makes pumpkin cookies too... Well, I'm just wondering, mind you.

  
Spellbinder Pumpkins and Spellbinder tag


Arlene and the Die Cut Divas

Wednesday, August 12, 2015

Loving the Team's Cards

Our team has been making some fantastic cards 
and these continue to be creative and fantastic.


August Challenge is Your Favourite Holiday

Monica takes us on a ride, on a broom, yes, but you can't miss a ride when it comes your way.  I love the bright colors and wonderful face on this image.
Le Crystelle supplies: Spellbinders Label 8
Misc: Copics, CC design digi image, sentiment stamp, washi and enamel dots


Cathie brings the poinsettia to life.  A gorgeous card to show the versatility of the step card and dies.
Spellbinders Poinsettia Die
Dienamics die scrolly corner die
Distress Ink Barn Door
Gina K Designs Frame and Flower stamp set
Gina K Designs Season Greetings stamp set


Michelle chose some stamps from Le Crystelle Clothing and Crafts to play with and if you know Michelle, you know her play results in something fabulous, as is this card.

Le Crystelle Clothing and Cards Spellbinders 283 Heirloom OrnJustRite Christmas Miracle Ornament stamps

Arlene is going crazy this month.
Yes, I'm up to using TISSUE BOXES AGAIN 

I just used the die over and over again to see how it would look built up.  
My poinsettias and leaves are made from ordinary tissue boxes, not even the really pretty ones, these were the ugly colors.You can see some of the close-ups at 
A Bit of This and That.

Arlene and the Die Cut Divas


Monday, August 10, 2015

Hang the Ornaments with Arlene

Ornaments make the holiday tree the best ever, but they should also be the star on a card.

lecrystelle

August Challenge
Your Favourite Holiday

It is so easy to make this card.  The ready made step card is perfect.  Die cut the Heirloom Ornaments and some bling is all it takes.

 Le Crystelle Clothing and Cards 2 Fold Heirloom
Le Crystelle Clothing and Cards Spellbinders 283 Heirloom Orn
Embossing folder
Starform Stickers - Transp. Glitter/Gold
Eliazabeth Craft Designs Stickers

I couldn't make just one.
 Le Crystelle Clothing and Cards 2 Fold Heirloom
Le Crystelle Clothing and Cards Spellbinders 283 Heirloom Orn
Colored gems
Christmas papers at Le Crystelle Clothing and Cards (I love this patterned paper.

Arlene and the Die Cut Divas

Saturday, August 8, 2015

Cathies Words of Joy

Cathie uses a cheerful background  of joyful words to coordinate with her ornaments.  Lots of fun colors going on!

lecrystelle

August Challenge
Your Favourite Holiday


Le Crystelle Step Card
Spellbinders Heirloon Ornament Die
Bazzill Patterned Paper 
AmyR Stamps Merry and Bright stamp set.

Arlene and the Die Cut Divas

Thursday, August 6, 2015

The Key to My Heart


I think it's raining Hearts at 
Le Crystelle Clothing and Crafts is our sponsor for August

lecrystelle

August Challenge
Your Favourite Holiday

Marsha has created a stunning and elegant card for us and I have fallen in love with it.  Don't you love the elegant heart on the back panel?  All I can say is WOW! 

 Lace Hearts

Arlene and the Die Cut Divas